Green-Screen Effect on the iPad ....

Green-Screen Effect on the iPad ....

with Katie Ann Wilson

After I started in using my Green-Screen in my classroom it became a buzz around our school.  Since I have computers I can use to create the Green-Screen effect teachers that have iPads asked if there was an app for that.  I did a little digging and research, even though there is an iMovie app it does not do the Green-Screen effect at this time.  This discovery made me look into other apps and if it was even possible to create the Green-Screen effect with the iPad and not costing an arm and a leg.  My search lead me to Veescope Full.  The app does coast $2.99 but I think it worth it.  Veescope Full is very easy to use.  You select an image from your Photo Library on your iPad, stand in front of your Green-Screen, or in my case my green wall and record.  The image you had picked from your Photo Library is now your background.  Once you finish with your recording it saves in your Photo Library on your iPad.  You can share it like you would any video or photo. 

I have tried doing the Green-Screen effect just using my iPad to record and doing the effect in iMovie on the computer.  Now that I have used the iPad to create the Green-Screen effect video I have to say the Veescope Full app is much easier.  The only issue I had and this could be the techie in me is that you can't change the background image during a recording unless you stopped the recording change the background and then continued recording.  Maybe in the future the company will add a feature that will let you rotate background images while recording.  


Tip:

  • Do not download the Live version.  It will cost you $2.99 in app purchase to create a Green-Screen effect video.  Download the FULL version.
  • You can really use any solid color to do the effect, just don't let the person recording wear the same color as the background they are standing in front of.  I did find out that green is still the best color to use.
  • Invest in a tripod and iPad mount to help keep your videos from having the swaying feel to them.  
  • Record in a silent area.

Courses/Workshops:

I am now offering some courses/workshops on the topic of Green-Screen an iPad.
Visit my website for more details. - www.katieannwilson.com 


Digital World Meets Reality With AR....

Digital World Meets Reality With AR....


To define augmented reality it is an enhanced version of reality created by the use of technology to overlay digital information on an image of something being viewed through a device such as an iPad.

My Social Studies students created an AR project with the use of the LAYAR Creator and the LAYAR App.  


How We Created the Project:


  • Students drew on paper their name in Greek. (Make sure to use bold colors.)
  • Name tags were scanned to make them digital.
  • We uploaded the digital name tags to the Layar Creator. (This becomes your trigger image.)
  • We had already created our Ancient Greece Artifact Videos (with Green-Screen effect) and our Ancient Greece Presentations via Prezi.  After we uploaded the digital name tages students were able to overlay their videos and presentation on top of their digital name tag in the Layar Creator
  • When everything was in place we then published our AR Campaign to make it live.
  • We tested our creations by scanning the original drawings with the Layar app

Tips:

  • If creating an image on paper make sure the colors are bold or well defined.
  • You have to verify your Layar account via email before you can publish.
  • Make all trigger images digital if you are creating them on paper, clay, poster, and etc...  Scan the trigger image or take a digital photo.

Looks What Playing....

Looks What Playing....


To make sure I included writing, listening, speaking skills into my keyboarding class I had my students illustrate, write, and record a digital story.  They recorded their stories in front of the green-screen so that their illustrations would be displayed behind them as they told their stories.  It took several takes but we finally had our stories.


Tools Used:

  • The iPad's built in camera for recording.
  • A tripod with a iPad mount to hold the iPad still.
  • iMovie to put it all together.

Steps Before Recording Stories:

  • Students created their illustrations in Google Draw.  Students could draw out their illustrations on paper and scan them.  Illustrations just need to be digital to be added to iMove. 
  • Students composed their stories in Google Docs.
  • Students practice in front of the green-screen several times before recording.


Steps in Creating Our Digital Stories:

  • Illustrations need to be saved as a jpeg (a picture file) and imported into iPhoto if using a Mac or saved in a folder on your Windows computer.
  • Video recordings need to be imported into iPhoto if using a Mac or imported into your Windows video editing software.
  • In iMovie create a new Project without any themes.
  • On the story board in iMovie drag and drop your illustrations in order.  They can be found when you click on the camera icon on the bottom right side.  
  • You can change the timing of your pictures by click on the arrow on your illustrations placed on the story board.  On most of my illustrations we had them timed to 10 seconds.
  • Add a Title and the Author slide those can be found right tight next to the camera icon by clicking on the T icon.
  • Change the Preference settings in iMovie so that you can see the Advance Tools. (You only have to do this once.)
  • Drag your video and drop it onto your illustrations on the story board.  You must drop your video ON TOP of your illustrations in the story board.  You will see a Green Circle with a Plus Sign.  When you do drop your video and choose Green-Screen.
  • Adjust your timing so that your illustrations match up with your story telling.  (This does take practice.)
  • Share your creation.  I have uploaded our stories to my teacher YouTube account and also have housed them on a Symbaloo board.

Tech Tips:

  • Record in a silent area.  We discovered that the mic on the iPad loved to pick up background sounds.
  • Practice telling your stories several times before recording.  This helps relax the storyteller.
  • Don't delete video recordings off the iPad or camera until after your project is finished.  Just in case you delete the video off the computer you still have the original recording.
  • If you are using a Windows computer you will need to be familiar with its video editing software.

To view our stories you can visit my Teachers YouTube Channel or my Symbaloo board.

Digital Storytelling the Green-Screen Way....

Digital Storytelling the Green-Screen Way....


As part as a rule I have for myself I never have my students do anything I haven't done.  So with that in mind I created a digital story with a green-screen effect.  Their assignment was to illustrate a story using Google Draw and then record themselves telling their story in front of the green-screen.  After they are done recording their story then they are to import their video into iMovie and put together their Digital Story with a little help from me.

The 1st step in creating a green-screen effect digital story is to have your illustrations done first followed by your story typed up.  It is best to memorize your story so that you appear that you are telling your story not reading it from a script.  I do recommend that you practice several times telling your story in front of the green-screen before you record it.

Here is my story I created for my students.


Steps:

  • Draw your illustrations.  (I used Google Draw.)
  • Record in front of the green-screen telling the story.  (I used the video recorder on my iPad.)
  • Import your video into iMovie.
  • On the story board in iMovie drag and drop your illustrations in order.  You can change the timing of your pictures.  On most of my illustrations I had them timed to 10 seconds.
  • Add a Title and the Author.
  • Change the Preference settings in iMovie so that you can see the Advance Tools. (You only have to do this once.)
  • Drag your video and drop it onto your illustrations on the story board.  You will see a Green Circle with a Plus Sign.  When you do drop your video and choose Green-Screen.
  • Adjust your timing so that your illustrations match up with your story telling.  (This does take practice.)
  • Share your creation.  I uploaded my story to my teacher YouTube account.

Tips:

  • Record in a quiet room.
  • Be patient.
  • Make sure you have Advance Tools showing in iMovie.


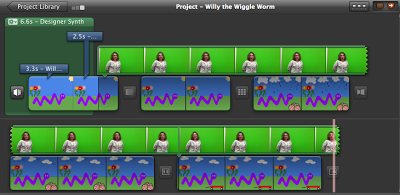
Your story board should look like this once you have overlaid your video
on top of your illustrations.
I did find an iPad app that does do Green-Screen effects.  I will post more information about the app once I have had a chance to really play with it.

Seeing A Different Kind of Reality...

Seeing A Different Kind of Reality...

Google Glass has made a wave of excitement by introducing Augmented Reality.  I was introduced to Augmented Reality during the MACE conference's by the keynote speaker.  I found it very intriguing and just had to learn how to create this different kind of reality.  I did a little research and found a company LAYAR that offeres a augmented reality reader and creator that was free.  Being a teacher free is the best price for my classroom.  

You can use any type of image, artwork, picture, and etc... as the TRIGER image for your Augmented Reality the only catch is that it will need to be digital.  Which means if it is a drawing or artwork of some kind you will need to take a picture of it or scan it.  I first tired it out with 2 digital pictures of myself and overlaid a link to my classroom website, Tweeter feed, a slideshow, and a YouTube video.  I used the LAYAR creator to make my Augmented Reality.  After I had published my new campaign I was able to use the LAYAR APP to view my new reality. 


Changing Presentations:

After I taught myself how to use the LAYAR creator I had my students create a presentation to overlay on top of a picture I already had them.  My goal was to have it look like they were holding their presentation. 


Example:

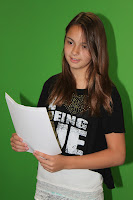
Original Picture
When scanned with the
LAYAR App she holds an
 interactive presentation.


Tip:

  • Make your trigger object is digital. (Take a picture of it or scan it.)
  • You have to verify your email account before you publish and make your Augmented Reality live.
  • Test your campaign before others try to scan your trigger image, just to make sure it is all working.