Which Came First? The Chicken or the Egg.....


Which Came First? The Chicken or the Egg......

Objective: Students will observe the development of an animal by documenting their observations and questions during the duration of their study using their Animal Observation Journal.

Standards: K-LS1-1. Use observations to describe patterns of what plants and animals (including humans) need to survive.

Resource: Animal Observation Journal - This handout can be used if your students are hatching chicks or even if you are just observing chicks already hatched. (You will need to print several copies or use Kami if wanting to keep the journal digital.)

Vocabulary: Eggshell, Embryo, Incubator, Incubation, Development, Hatching, Candling, Hen, Rooster

~~~~~~~~~~~~~~~~~~~~~~~~~~~~~~~~~~~~~~~~~~~~~~~~~~~~~~~~~~~~~~~~~~~~~~~~~~

Incubation Cycle: 
Follow the instructions of the incubator.

Materials: Fertilized Eggs, Incubator, Candler, 

On the 4th day of the incubation cycle, eggs can be candled. If you do not have a candler, do not worry you can create one from a LED flashlight. The Chicken Chick blog had pretty easy instructions to follow and included pictures of the embryo development.

Instructions:

  1. Have students observe the development of their chick embryo by candling the egg. (If not hatching the chick then the observation of the live chick, measuring its height, weight, etc,,.)
  2. During their observation time have students fill out their Animal Observation Journal documenting what they see and the questions they have.
  3. To help guide the discussion and the development of the embryo found this Development Wheel helpful. 
Questions:
  • What is an embryo?
  • What makes the embryo alive?
  • What do you think the eggshell's role is in the development of the chick?
  • Do you think the egg could hatch on its own?
  • What do you think the role of the incubator is in the development of the chick?


How Do Your Flowers Grow?

 How Do Your Flowers Grow? 

~~~~~~~~~~~~~~~~~~~~~~~~~~~~~~~~~~~~~~~~~~~~~~~~~~~~~~~~~~~~~~~~~~~~~~~~~~~~~~~~~~~~~~

Objective: Students will observe the life of a plant by documenting their observations and questions during a plant cycle using their Plant Observation Journal.

Standard: K-LS1-1. Use observations to describe patterns of what plants and animals (including humans) need to survive.

Resource: Plant Observation Journal (You will need to print several copies or use Kami if wanting to keep the journal digital.)

Vocabulary: Observe, Seeds, Soil, Clay, Sand, Sunlight, Growth, Carbon Dioxide, Oxygen, Water, Fertilizer, Bloom, Sprout, and Life Cycle.

~~~~~~~~~~~~~~~~~~~~~~~~~~~~~~~~~~~~~~~~~~~~~~~~~~~~~~

Materials: Pots, Potting Soil, Flower Seeds, Fertilizer, Water, and a Small Scoop

Instructions:

1. Fill your pots with soil.

2. Sprinkle a small scoop of fertilizer over the soil in each pot. (Follow the instructions on the bag for the fertilizer.)

3. Plant a few seeds in each pot and cover with soil.

4. Give the pots the same about of water and place them in sunlight.

5. Record your first observations and questions in your Plant Observations Journal.

6. Check the soil in your plants daily. If the soil is dry add water. You want to keep your soil damp not muddy.

7. Record your observations and questions as you watch your flowers grow.

8. Once your flowers bloom continue to water and record your observations.

~~~~~~~~~~~~~~~~~~~~~~~~~~~~~~~~~~~~~~~~~~~~~~~~~~~~~~~~

Questions:

What do plants need in order to grow?

What might happen if the plant does not get water?

What might happen if the plant doesn't get sun?

How long did it take for you to see a sprout?

How long did it take for you to see a bloom?


Digital Game Boards

 Digital Game Boards

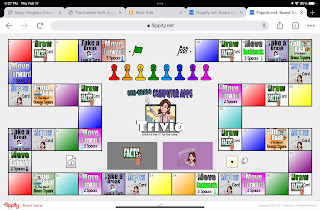
Who does not like to play a game, board game, card game, trivia, a puzzle, etc? We learn through play, it’s in our human nature. That is why we see play kitchen play sets, tool play sets, doctor play sets, veterinary play sets, etc. We learn best by playing, experimenting, and exploring. One of my personal and professional goals was to create a digital game board for my 8th-grade Computer Application classes to introduce Spreadsheets. In the past I have used Spreadsheet Battleship, Sudoku, and other interactive digital games. I do this one to capture the attention of my students, two change the perspective of how spreadsheets can be used, and three to inspire.

The digital tool that I used to construct my digital game board is Flippity. I love the tools Flippity has created that make learning fun and engaging. Flippity has created spreadsheet templates that are amazing. All you have to do is replace their content with yours. Once you have personalized the content the key to making it work is sharing the spreadsheet to the World Wide Web, a.k.a. the internet by publishing it to the web. Flippity offers step-by-step instructions, as well as frequently asked questions. All to aid in a positive experience in using their tools.  

Here is the game I created for my 8th-grade Computer Application classes. Feel free to personalize it to meet your needs. I did use my Bitmoji and Google Draw in creating some of my squares. The key in using that method in creating my squares is by publishing my Google Drawings to the web and using that url in the Flippity template.

8th-grade Computer Application Trivia - File

8th-grade Computer Applications Trivia - Game


Other Digital Games:


Student-Created Digital Breakouts...

Student-Created Digital Breakouts...


Education is not one size fits all. To meet the needs of today's learners teachers need to use a wide variety of ways to assess students' knowledge. In my opinion, traditional testing truly only measures a student's ability to memorize, regurgitate, and discard. Why hold onto that information if you do not truly understand it, apply it, or even have the desire to use the information. For example, I once had to memorize dates for certain battles for a class. To this day I cannot recall those dates, I could for the test though but not now. Those dates are not important to me, I cannot use them in any way in my current life. Now the reasons for those battles, that information could be important, but I spent so much time trying to memories those dates I have also forgotten the reason for the battles.

As a teacher, we need to truly understand what students know and teach them how to apply their knowledge. We also need to instill a desire to continue to learn and grow. Just memorizing data to pass a test is not good enough in today's society. We also need to teach our student to think, troubleshoot, problem-solve, and to realize their first attempt is not their last one. Having students create, explain, demonstrate, design, explore, develop, etc... will allow teachers to truly assess not test but assess a student's understanding.

We need to rethink what an assessment looks like. We also need to embrace that each student is different and not all assessments will work. Having students create Digital Breakouts is a way we as teachers can personalize learning for each student and truly assess their knowledge and abilities.

So what is a Digital Breakout?

A digital breakout uses the same concept of solving a series of clues to unlock locks as the physical breakout does. A Google Form is used as the locks. Using a Google Form you can create a wide variety of locks. A digital breakout has no need for any additional equipment. All that is necessary is a device connected to the Internet.

Students can create Digital Breakouts to demonstrate their knowledge on any topic. Once the Digital Breakout has been created then other students can apply their learned knowledge of the topic to solve the clues and breakout.

I will be speaking at ISTE19 over how students can create Digital Breakouts and how teachers can use these student-created breakouts as an assessment tool. So join me on June 26th at 1:00pm room 120A to learn more. If you cannot make it below is a link to the resources I will be sharing.


Resources: