Showing posts with label DIY. Show all posts

Digital Game Boards

 Digital Game Boards

Who does not like to play a game, board game, card game, trivia, a puzzle, etc? We learn through play, it’s in our human nature. That is why we see play kitchen play sets, tool play sets, doctor play sets, veterinary play sets, etc. We learn best by playing, experimenting, and exploring. One of my personal and professional goals was to create a digital game board for my 8th-grade Computer Application classes to introduce Spreadsheets. In the past I have used Spreadsheet Battleship, Sudoku, and other interactive digital games. I do this one to capture the attention of my students, two change the perspective of how spreadsheets can be used, and three to inspire.

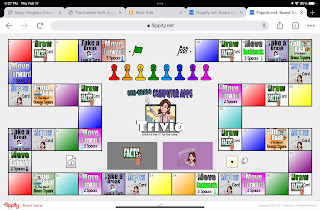
The digital tool that I used to construct my digital game board is Flippity. I love the tools Flippity has created that make learning fun and engaging. Flippity has created spreadsheet templates that are amazing. All you have to do is replace their content with yours. Once you have personalized the content the key to making it work is sharing the spreadsheet to the World Wide Web, a.k.a. the internet by publishing it to the web. Flippity offers step-by-step instructions, as well as frequently asked questions. All to aid in a positive experience in using their tools.  

Here is the game I created for my 8th-grade Computer Application classes. Feel free to personalize it to meet your needs. I did use my Bitmoji and Google Draw in creating some of my squares. The key in using that method in creating my squares is by publishing my Google Drawings to the web and using that url in the Flippity template.

8th-grade Computer Application Trivia - File

8th-grade Computer Applications Trivia - Game


Other Digital Games:


Portable Mini Green-Screen....

Portable Mini Green-Screen....

One of the projects I like to do with my 6th grade students is "On the Scene Reporter".  I have a wall in my classroom painted green, for our staging area that I normally use for this project.  My students are normally the reporter giving a report on Ancient Greece.  Since this will be my 3rd time doing this project I have to switch it up just a little.  I've been planning a workshop for teachers on Green-Screen projects and it hit me how I could switch it up and still be a green-screen project, I need portable mini green-screens.  It just happened to be Super Bowl day and we just happened to have gotten some extra large pizzas from the store so I had a few boxes to play with.  Since the pizza boxes had a window I decided to paint the inside and the back of the box, this way I could use both sides.  I could use the box as a regular green-screen or flip it and have a puppet show / animation stage green-screen style.

Puppet Show / Animation Stage
I choose a pizza box because it is flatter and can stand up by itself. Which will make it easier to travel with and to store.  As I played around with the box and the green-screen app Veescope I did noticed that you had to be careful with lighting and shadows.  I also noticed that some of my props or actors were a little on the short side so I took another box and painted it green to make a platform for them to stand on.  My little actors can now blend in better with the background image or video.

One of the reasons I decided to create a mini green-screen was because I have a few students who love Legos and I know they would create some amazing stories using green-screen and their Legos.  I also have a few shy students who refuse to stand in front of a camera and give a report.  Having a mini green-screen would give them an option to still do the project but use an actor to replace them as the reporter.  They would still have to add their voice either at the time of recording or overlay it with the iMovie app.  Either way it is a win, win situation.  My students are now not only the reporter but now they can be a director, producer, casting director, writer, and agent.

Paint a smaller box for a platform.
Having a portable mini green-screen would also allow my students to record anytime and anywhere.  Giving them a choice on how they can do their green-screen projects opens the door to their creativity.

Project Ideas:


  • On the Scene Reporter
  • Puppet Show
  • Book Trailer / Report
  • Use Paper Dolls / Print out of famous people & make them move and tell their story.
  • Wear a Green Glove and Make the Actors Move
  • Paint Bamboo Skewers Green and Attach them to the Props & Actors to Make Them Move
  • Use Explain Everything and work out a math problem.  Use that recording as the background in the Veescope app and have your actor explain how they solved the problem.
  • Have a time lapse video of a plant growing, science experiment, etc... saved into the Veescope app as the background.  Then have your actor explain the process.
  • Create Postcards of places your actors saw while on their Dream Vacation.


Tips:

  • Paint smaller boxes and use them as platforms for your props and actors.
  • Use an iPad stand to position your iPad just right for recording.
  • Record or snap stills in a well lit area or use a desk lamp with a bendable neck to provide lighting.
  • Record in a quiet place.
  • Save images and or video clips to the iPad that has the Veescope app.
  • Use the Full version of the Veescope app. 


Moving Out of the Lab....

Moving Out of the Lab....

In the past students and teachers could only obtain access to technology was through a lab setting.  Schools hired professionals to teach and or train students how to use the technology.  Once students left the lab setting they left the technology behind.  In todays world that is no longer the case.  With schools going 1:1 with devices is the lab really needed?  There are some pros and of course cons to having a lab and 1 person responsible for teaching how to use the tech.

Pros for a Lab: 

  • All devices are set up the same and have the same programs.
  • 1 person is responsible for the instruction.
  • Instruction is structured. 
  • Desktops don't walk away and are stationary.
  • Can be monitored.

Cons for a Lab:

  • Only 1 person is responsible for the instruction.
  • Desktops are not mobile.
  • Technology and skills stay in the lab.
  • Limited time and use in the lab.
  • Instruction is structured.
When it comes to technology and learning how to use it needs to be put in real world experiences not in a structured lab setting.  One teacher shouldn't be the only one teaching kids how to apply the technology in real world settings.  Technology is no longer just available in a lab, but can be found everywhere.  The more diverse kids are with technology the better prepared for the real world they will become.

How Educators Can Connect and Learn the Tech:

  • Find the Learning Platform that works for you either being face to face, online professional development, webinars, edcamps, and etc...  
  • Don't be afraid to let your students teach you how they use the tech.
  • Don't be afraid to fail.  Failing is the 1st step in learning something new.  When we learn to walk we fell with each step until we mastered balancing and walking.  That didn't stop us from wanting to learn to run.

My Personal Learning Network: 
Just to name a few

Making Colored Rice ....

Making Colored Rice ....

Colored rice is a fun medium to use for different craft or art projects.  For a Kansas Day project my daughter and I colored rice and glued it to a Jayhawk.

Materials Needed:


  • Food Coloring
  • Rice
  • Ziplock Bags
  • 1 Tablespoon of water for each color
  • Glue
  • Paper Towels

Steps for Each Color You are Making:

  • In a ziplock bag add 1 tablespoon of water.
  • Add food coloring to the water to your liking.
  • Add the rice you would like to color to the colored water.
  • Squish the rice around in the bag until all of the rice is colored.
  • If the color is too light you can add more food coloring.
  • Once your rice is all colored spread out the rice on a paper towel to dry.
    (I let my rice dry over night.)
  • Repeat for each color.

Making Your Project:

  • Spread glue all over the area you want to add colored rice.  We did one section at a time.  For example we spread glue on the beak.
  • Cover the glued section with the colored rice.
  • Over a trash can shake off any extra rice.
  • Repeat for each section.


Removing a Green-Screen as Easy as 1, 2, 3 with Gimp

Removing a Green-Screen as Easy as 1, 2, 3 with Gimp


I've been playing around with different photo editing tools.  I have always loved Gimp.  It is like Photoshop but the cost is way better, if you like free.  It is a program you have to download and they do have a version for Windows and Mac.

Steps to remove the Green:

  • Always make a copy of the original photo, just in case you really mess up you still have the original.
  • Open your photo in Gimp.
  • Go to Layers and Add an Alpha Channel.
  • In your Tools choose the Color Pick Tool.  
  • Click on the Green background.  It should outline your main subject.
  • Go to "Edit" and choose "Clear". You make have to repeat a few times.
  • Create a New Layer and make sure it is Transparent. 
  • Open the photo that will become your background in Gimp.
  • Using the "Select" tool, select what you want to copy.
  • Go to "Edit" choose "Copy".
  • Go back to your 1st photo, the one you removed the green from.
  • Click on your new layer.  Go to "Edit" and choose "Paste".
  • You will need to click on the "Anchor" icon in the Layer window and "Anchor" it to the new background layer.
I did find a YouTube video clip that shows the steps.  


Tech Tips:

  • Always make a copy of your photo before you begin to edit it.
  • You can always undo something if you mess up or you don't like what the program did.
  • Be patient. 

Sparking Ideas....

Sparking Ideas ....


Pinterest is wonderful for sparking ideas.  I really like looking through Pinterest to see what other people are making, baking, or saving for later.  I have board in Pinterest of some of things I've made thanks to other people either creating and sharing or finding it and saving it for later.  For Easter I saw that someone made a wreath using plastic eggs.  I spent $2.00 on a bag of medium plastic eggs and $1.00 on a bag of small plastic eggs.  A hot glue gun, an unfinished wreath, and 45 minutes later I had this cute Easter Egg Wreath I can hang in my classroom.


Tips:


  • Follow people in Pinterest that have the same interest as you.
  • Keep your boards organized.
  • Share what you are making, baking, or saving.
  • Make sure the link you pin is not broken.

Some of My Boards:

Learning with YouTube...

Wrapped Yarn Project

Learning with YouTube ....

Pinterest has recently became my new best friend.  I am such a visual person and I love being able to save a picture that is linked to a resource I can use.  One of the resources I saved was how to wrap large letters with yarn.  This project looked very doable for this "Do It Yourself" person.  After I was done with that project I had lots of yarn leftover.  As a young girl I watch my mom crochet tons of different items.  I thought to myself what the heck I should give crocheting a try.

Since I have really never been very good at crocheting I thought I would do a little research on YouTube and find some video clips that would help me with this new project.  Within minutes of my research I found several videos that went step by step on how to do a simple chain pattern.  What I loved the most about learning via a Youtube video is that I can pause and go back as many times as I needed.  After a few fail attempts I was able to make a baby doll blanket for my Angel's baby doll she had gotten for her birthday.

As a teacher and teaching technology skills and Ancient History I see many benefits of using YouTube in the classroom.


Tech Tip:

Crochet Baby Doll Blanket

Where in the World

Where in the World

This school year I am adding 6th Grade Social Studies to the list of subjects I get to teach.  My plan was to have a simple bulletin board and place a few postcards around a map to help teach mapping skills.  Thanks to an amazing PLN and friends my simple bulletin board and lesson has grown.  Before school has even started I have received several post cards which sparked ideas on how I can make connections with these postcards not only to mapping skills but to people, culture, and world history.  My simple bulletin board is now a wall with 3 different map types.  Since I am also a very techie person I now have an interactive map thanks to ZeeMaps that I posted to my classroom website.  As we receive postcards from around the world I will pin the places on both the Where in the World Wall and interactive map.

I even added a QR Code to the wall as a short cut to the interactive map.

Click here to view my interactive map. 

ZeeMaps Tips:


  • Add a Reliable Website
  • Change Pin Colors
  • Add a Picture

Box Tops 4 Education

Box Tops 4 Education 

box tops bonus website badge
As the beginning of a new school draws near the campaign for Box Tops 4 Education gets under way.  You can find bonus Box Tops on many of your favorite back to school items as well as food.  I don't know about you but I try to remember to cut out the Box Top, but sometimes I just forget. It seems that each year the program becomes stronger. I was web surfing and by accident I came across their website.  Did you know you can earn Box Top points digitally?  You can even keep track on your school's progress and see how much money your school has earned.  

Before I start promoting eBox Tops I had to try it out.  In 2 minutes I earned for Liberty Middle school $0.60 digitally and all I did was look at one of their recipes.  I also learned that the program has teamed up with several other companies such as Target, Kmart, Walmart, Kohls, iTunes, and many more to offer eBox Tops.  

eBox Tops:

  • Sign up for a free account.
  • Found your school and select it.
  • Go to the Market Place and start shopping.  You will earn digital Box Tops for your school. (There is over 175 stores you can shop at.)
  • You can also earn digital Box Tops by going to Click & Earn.

Tips for Box Tops:
  • Look for Box Tops and cut the out.
  • Bundle your Box tops in groups of 10.
  • Keep a collection sheet
  • Don't forget to turn them in before their expiration date.
  • Look for Bouns Box Tops.

Make a Dynamic Website for Your Classroom

Make a Dynamic Website for Your Classroom


As I prepare for the new school I decided that my classroom website needed a make-over.  My goal is to make a website that is both informational and interactive.  I want my website to be the 1st place my students to go to for their assignments, discussion topics, resources, and important information.  I want my classroom website to be an extension of my classroom.  I've attended several webinars and looked at several other teacher's websites to help me get some ideas of how to approach rebuilding my site.  There are several places you can go to in order to get a free website for example; Google Sites, Weebly, Webs, and Wix to name a few.  I used Google Sites for my 1st classroom website.  It worked ok, but I needed a change.  For my rebuild I wanted something more dynamic, a site that would grap my student's attention.  I decided to use Weebly because they had an educational side and plus it was free.

Building with Weebly

Weebly was very easy to use.  All you have to do is drag and drop the elements where you want them.  You can even copy and paste your text if you already have it typed up.  To make my site more dynamic I added my Google Calendar, a slideshow, a Voki, and an Interactive Worksheet.  I also added buttons to the sites that we will be using the most.

Resources for building a site with Weebly:
Keep in mind as you look around on my site that I am still building and tweaking it.

DIY Ideas for Your Classroom

Do It Yourself Ideas for Your Classroom

I have been surfing Pinterest for DIY ideas I can use in my classroom.  Teachers do a great job sharing their ideas.  I discovered tons of inventive, creative, amazing, and genius ideas I can't wait to try in my classroom.

Some DIY Ideas:
I can't wait to use this in my classroom.

  • Buy $1 tins to hold pencils.  Label one tin "Needs Sharping" and the other "Sharped".
  • Buy $1 tin and label "Please Return Me" and place pencils in it.
  • Find a straw dispenser and turn it into a pencil dispenser.
  • Recycle frosting containers.  Color each one a different color and place that color of colored pencil in the container.
  • Store your bulletin board boarders in recycled frosting containers.  Cut a small section of the boarder and attach it to the outside of the container. (I store all of my boarders this way.)

Dispensing Erasers Gumball Style:

  • Find a Gumball Machine - I bought a Junior Carousel Gumball Machine Bank 12" from Amazon.
  • Fill it with eraser toppers - I found 25 for $0.88 all different colors.
  • Make a sign Pencil Erasers $0.05 each


Inspired by Crayons ...

This now hangs in my classroom.

Inspired by Crayons Melted Crayon Art

One day I was surfing through Pinterest and came across some examples of Melted Crayon Art.  So being a little crafty I decided to learn more about this type of art and give it a shot.  During my research I discovered many different types of melted crayon art.  Some people used canvas while other used foam core boards, and yet a few used wood planks to attach the crayons to.  Then I noticed that some people left the wrapper on the crayons while others removed them.  


Inspire:
Materials:

  • Foam Core Board 16x20
  • A Rainbow of Crayons
  • Hot Glue Gun & Sticks
  • Black Letters
  • Mod Podge
  • Foam Brush
  • A Tab for a Pop Can  
  • Heat Gun/Hair Dryer 
Directions:
  • Arrange your crayons in the order you want them on the board leaving white space on the sides and top (incase you want to frame it later).
  • Using your hot glue gun glue down the crayons.  I left the wrapper on the crayons they seem to attach to the board better that way.
  • Arrange the black letters to spell out the word you want to spell.  For example; Inspire, Dream, Hope, Faith, and etc... 
  • Using Mod Podge and the foam brush glue down the letters.
  • Allow the Mod Podge to dry.
  • Using a heat gun or hair dryer start melting the crayons.  You will want to prop up the board so it will allow the melted crayons to run down the board.  Go slowly so that you don't have a flood of melted crayons.
  • Allow the melted crayons to cool.
  • I applied another coat of Mod Podge over the entire surface of the board to give it a finished look.
  • Flip your board over and attach the the pop can tab using your hot glue gun to the top of the board making sure you center it.

Be as creative as you want with this project and use the colors you like.  I picked out a rainbow you could do different shades of blue, purple, red, and etc... 

Digital Savings and More

Digital Savings and More

I have been doing research on saving money through digital coupons.  During my research I came across the Procter and Gamble e-Store.  I had no idea they had an online store.  I had really never thought to look for one either.  In the past when I am out of toothpaste, laundry soap, and etc... I just head for the store and purchase what is available.  


I browsed their website/e-store and found digital coupons that only worked with their e-store.  I looked through what they had to offer and boy did I find a variety of items I wished our small town store would carry.  I looked at their e-store coupons, shipping cost, shipping time, and sale items.  Then I decided I was going to give this a try.  I picked only items that had a e-store coupon and I didn't need right away.  I had an e-discount code that gave me 20% off my order plus I met their free shipping requirements.  I ended up saving $21 by purchasing my toothpaste, dish soap, and etc... this way.  I should receive my oder in 5 to 7 days.  

Tips:


  • Only place an order if you meet their FREE shipping offer.
  • Pick items that have a coupon or items you can not normally get from your local store.
  • Check to see if you can find a e-discount code.

From Rags to Riches

From Rags to Riches

Repurposing T-shirts

I had purchased a Earth Day T-shirt and only had a chance to wear it at least twice before I snagged it.  Right in the middle of my new T-shirt was this big hole.  I had been reading about how people repurpose t-shirts.  Some people made outfits for their children, others made scarves, and still others made quilts, baby blankets, and even pillows.  I saw where one person turned a t-shirt into a vest.  I am into layering my outfits and thought this would be a great idea, since the hole was right smack in the middle of the shirt.

Directions:
  • Cut the seam of at the bottom off the shirt off.
  • Cut the seam around the neck off.
  • Cut both of the sleeves off.
  • Find the middle of the front of the shirt and cut along it.  Be careful and do not cut the back.
  • Take 2 strips of material from the cut sleeves.  Make sure they are the same size.
  • Wrap one strip around the top part of the shoulder area.  From the cut arm sleeve area to the cut neck area. 
  • Sew the strip together as if you just made a loop.  Flip the strip inside out so the seam is hidden. Repeat on the other side.
I am sure I could have added ribbons or even a ruffle to make cute.  I could had even used ribbon for the loops for the shoulder area or even cut the shoulder seams and tied them.

Before you toss that T-shirt think could it be used for something else or even turned into something else like a dress for your daughter.

Chalkboard Paint

Chalkboard Paint

On Pinterest I learned about chalkboard paint.  There are many uses of chalkboard paint and being a teacher I just fell in love with some of the DIY chalkboard paint projects. I had some wine glasses so I decided to dip the bottom of the glass into the chalkboard paint.  For a get together I was having I passed out the glasses and some chalk.  My guests decorated the glasses with the different colors of chalk.  At the end of the night my guests took home their glasses and some chalk.  Everyone enjoyed decorating their party favor and loved that they were able to take them home.

Some other projects you can do with chalkboard paint:
  • Paint a Wooden Sign and Hang or Display
  • Paint a Cookie Sheet and Hang or Display
  • Paint a section of a wall in a kids room or playroom
  • Frame a Painted Board and Hang or Display
  • Paint a Recycled Bottle and put flower in it
  • etc...


Tips on Digital Couponing

Tips on Digital Couponing

On my 1st attempt to use digital coupons I saved $20.  I was so proud of myself that I tried it again.  This time I took my husband with me so he could see what I was doing.  On my second attempt I saved $12.72.  So in my two times I tried out digital coupons I saved a grand total of $32.72, not too bad.  I impressed my husband so much he decided he wanted digital coupons added to his Dillons card, so like a good wife I set him up.  Now when ever I clip a digital coupon not only does it go to my rewards card but now it also goes to his.  Since I now have over 60 digital coupons loaded on to my rewards card I wasn't sure how I could keep them all straight.  Some expire before others and some you have to purchase more than one item or have to purchase a certain size.  I so wish that Dillons would make an app so that all of the coupons would show up on my phone.

Then it hit me.  No I didn't make an app for Dillons but there is a free web tool that will sync from my computer to my phone.  Evernote is a wonderful tool that can be used on any computer and will sync with the Evernote app on your phone and or iPad plus it is FREE.

Step 1: Sign up for a free Evernote account and download it to your computer.
Step 2: Load all of your digital coupons to your rewards card.
Step 3: Login to your account on the Dillons website.
Step 4: Go to In Store ---> Coupons -----> Digital Coupons ---> View Your Coupons
Step 5: Click Print List (a new window will open with a printable list of all your coupons)
Step 6: In your Menu Bar Click Edit.  Then Select All.  (on a Mac Command+A)
Step 7: Go Back to Edit and then Click Copy. (on a Mac Command+C)

Open up Evernote and create a new note.
  • Now you are going to Paste what you copy into the New Note - Either Edit ---> Paste or on a Mac Command+V.
Evernote auto saves.  I would name your new note Coupons + the Date, so that you remember when you saved your list, just a suggestion.

To view your list on your phone you will need to download the Evernote app which you can find in the App store.  Once you login to the Evernote app your Coupon list will be there.

When you update your coupon list you can either delete your old list from your Evernote and just paste the new one or you can make a new Evernote, your choice.  Once you do this a few times it will become easier.

Digital Couponing

Digital Couponing

Couponing has become a very big deal lately.  If you are fortunate enough to live in a town or city that has several of the large branch stores such as Cosco, Walgreens, Dillons, and etc... and you are into couponing then you have it made.  If you are like me and living in small town USA you really only have a couple of choices where you can shop and what you can buy. 

For the past year I watched several of my friends that live in large cities post their savings buy couponing.  I had tried couponing before but got frustrated when I had a coupon but couldn't use it due to the store not offering the item, so I stopped trying.

I recently participated in a webinar about couponing.  I learned a lot about e-coupons, print at home coupons, and digital coupons.  Being techie and trying to stay up-to-date on technology and web tools I had no clue that there was such thing as a digital coupon.  As soon as the webinar ended I checked out Dillons website and there it was Digital Coupons.  I thought to myself, this I can do.  Since Dillons is the only story in my area with a rewards cards I didn't look at other store sites.  If you are in an area and your store offers a rewards card you will want to check out their website.

The 1st thing you have to do before you can start loading coupons on your rewards card you have to register your rewards card on Dillons website by creating an account. This only takes a minute.

Once you are done setting up your account you want to stay on their website logged in.  On their website you will see a tab for "In Store" hover over it.  Click on "Coupons".  You will get a choice "Digital Coupons" and "Print at Home Coupons".  Click on the Digital Coupons.  All of the available coupons will appear.

Look over the coupons if you find a coupon you think you will use you click the box and check mark "Select Coupon".  You do need to be logged into to the website for this to work.  Once you have selected all the coupons you would like to use.  You need to click on the button "Load Coupons to Card".  You do have to wait at least 10 - 30 minutes before the coupons will be loaded to your Dillons reward card.

After you have your coupons loaded you head to the store do your shopping, don't forget to present your rewards card at check out. As you are checking out just watch the savings just roll out automatically.  On my 1st try of digital couponing I did save $20.

There are other websites and apps that also offer digital coupons.  If you choose to use those just a heads up.  The coupons you load to your Dillons card from the Dillons website will be used first or any in-store savings will be used first as well.  

If you choose to use an app to find digital coupons you will have to enter your rewards card number during the set up of the app for it to load the digital coupons onto your rewards card.

I am saving the other websites or apps that I find that offer digital coupons on my Couponing Board in Pinterest feel free to follow it.

Couponing Board - Pinterest
SMART Source Express App - can be found in the App Store (only for iPad)
SavingStar - can be found in the App Store (both for iPhone & iPad)
Cellfire - can be found in the App Store (both for iPhone & iPad)

Happing Couponing!!


The Diary of the Techie Chick


The Dairy of the Techie Chick ~

I have had lots of requests to have a blog and to share some tips, tricks, & ideas not only on the techie teacher side of my life but also the DIY (do it yourself) crafter, beginner chef/cook, digital couponer, and much more.  

The biggest request was to have one place where people can go and follow on the places I have resources, tools, and other information. Off to the side you will see the "Follow Me".  I have several boards in Pinterest, webmixes in Symbaloo, a Twitter account, a wiki of SMART Board activities, and teacher stores where you can download the lessons/activities that I have made.  Feel free to follow and to share my resources, tips, tricks, and etc...