Showing posts with label flipped. Show all posts

Creating AR with the Daqri 4D Studio....

Creating AR with the Daqri 4D Studio....


Augmented reality isn't anything new, it has been around for a while now. Creating your own augmented reality on the other hand has only been available in the recent few years.  This spring Daqri released their 4D studio to the education community. Out of all of the augmented reality creators I have used this one is by far the friendliest one to use. When I talk to others about creating augmented reality I hear; "That is too techie for me.", or "I just can't wrap my head around how it works.", or "There is no way I will be able to create something like that."  Let me ask you a few questions then.
  • Can you drag and drop?
  • Can you copy and paste?
  • Can you click on a button that says upload?
  • Can you click on a Plus Sign to start a new project?
  • Can you click on a button that says Save?
  • Can you click on a button that says Publish?
If you answered yes to these questions then you can create an augmented reality trigger.

For Podstock I created a mini tutorial on how to create a augmented reality trigger. Daqri did change a few things in their studio but it will not effect how you create a trigger.  You will just notice my screenshots just look a hair different.  I had put my tutorial in a NearPod presentation so I could monitor who accessed the presentation and evaluate their knowledge about the topic.  I will post the link to that as well.  Feel free to use the Google Presentation or the NearPod one. 

Just keep in mind this is a very basic tutorial.  I plan on creating more in depth ones soon. 


Presentations/Resources:

My Reflection of Podstock '14

My Reflection of Podstock '14

Podstock is one of my favorite conferences to attend.  I have only missed 2 of them since they started.  When I first met this group of educators and they were all dressed up like hippies I had my doubts, but they open their hearts and welcomed me in just like family.  The conference is more than just about learning it is about building relationships with other educators from around the world.  

Even though I live little over an hour away from Wichita I like to stay overnight and participate in the extra activities.  This year Podstock added a Pine Derby Car race. It was a lot of fun connected with others while sanding, painting, and decorating my little car.  I do have to say that my little car did beat a guy or two.  The reception is always a lot of fun as well.  The 1st year, if I remember correctly, the dance was both online via 2nd Life and in person.  I highly suggest that if you attend Podstock you should really participate in the little extras, it is always a lot of fun.  You never know you might win the next Photo Scavenger Hunt.

During the conference I attended several really great sessions.  I am trying to get out of my introvert shell so I picked session that I thought would help me do that.  I also tried to take selfies, which is very hard for me to do.  The Improv session was a amazing.  I never stopped and thought about some of the "Improv Games" that you play could relate right back to education.  If you think about it you are developing listening skills, character building skills, speaking skills, problem solving skills and face it, it is a lot of fun being a little goofy.

I try to submit a proposal every year to be a presenter, so far every time I've submitted I've been approved. This year I did a presentation on creating augmented reality.  My goal was to have a hands on session were by the time the attendees left the session they had created an augmented reality trigger.  In a perfect world that would have been amazing, but that didn't happen.  I learned that I need to have my own hot spot so I don't have to battle with a conference's WiFi, now only if I can convince my husband.  One of the things I hope the attendees of my session took away was that you can turn anything into a trigger.  For the conference I had made my avatar a trigger so when you scanned it you got more information about me.  I also designed a shirt for Podstock and turned that into a trigger, so when you scanned it you got information about Podstock.  To help others I created an Edmodo group and a Google+ community were educators can connect, get help, and share their experiences with augmented reality. I have tons of pre-made AR triggers saved in the groups and a list of AR apps. Feel free to join the community or group.

Resources:


A New Journey ....

A New Journey ....

Teaching is a passion of mine.  Teaching technology skills to other educators and students is a mission, passion, and a desire of mine.  I was recently asked if I would develop online course to teach a variety of technology or 21 Century Skills to other educators.  Without hesitation I agreed and quickly started building my 1st course.  I am really into creating Green-Screen projects with my students so I couldn't think of a better course to develop first.  Since creating Green-Screen projects can be as basic as possible to as complex as you want it to be I decided to create a handful of course designated to building different skill levels of Green-Screen projects.  The 1st course will give you just the basics.  You will learn how to navigate through the app I use with my students to create these projects.  I will walk you through how to set up the app, add your background images, and finally record.

The next course will go more in-depth with the app.  You will learn how to use more than one background while recording and how to focus for example along with many other options within the app.  The 3rd course will include how to take your recordings and use them with a video editing app.

I am also developing courses to teach kids how to code at all grade levels, along with engaging presentations (not PowerPoints or a slideshow), and how to create a connected paperless classroom.

Online Course:


App / Tool of the Week ... Edmodo Apps

App / Tool of the Week ... Edmodo Apps

Web tools and apps are amazing but setting up student accounts on the other hand is not.  Edmodo has found a way to incorporate web tool and apps with in the student' learning environment in Emdodo.  The best part is that students do not need to create an account and students do not really leave Edmodo.  The apps launch within Edmodo.  There are many apps for you to choose from. Some apps do cost while others are free to use.  The apps are tagged by category such as Math, Language Arts, Social Studies, and etc...

To launch the App Store you need to click on the icon that looks like a store window at the top right hand side of your screen.  Once in the App Store you look around and find the app that will meet your needs or your student's needs.  When you click on a an app you will get information about the app along with a description and even a list of apps that are similar to the one you are currently looking at.  Once you have found the app you want to use it is time to install it.  If it is a free app you simply click on the "Free" button and then check mark the groups you want to use the app with. You can choose to use the app with more than one group you are the owner of.  If the app cost you will have to purchase it and then choose the group or groups you would like the app installed to. The licenses for the apps do last 1 year from the day they are purchased.

Once you have your app or apps installed in the groups you are ready to go.  You can manage your apps by click on the wrench icon.  For example you really like an app and want to add it to another group you would go to the wrench to edit which groups has access to that app.  The 4 square icon launches a window for you to view all of your apps, where you can open them.  You can also add to the right hand side the apps you are using the most for quick launch.  To close the apps all you have to do is click on the X at the top right hand corner.


Students also have the 4 square app launcher.  Students do need to be in your group in their Edmodo account to access the apps you have assigned to them.  If they try to launch an app via their home screen in Edmodo they may not see it.

Tips:


  • If you would like more information on Edmodo Apps "Click Here" to visit their support page.  
  • I like to give my students a day a play.  I call it sandbox time.  Let them explore the app, see what they can create or do within the app.  Have them show each other what they learned.


Translation Glass Style.....

Translation Glass Style.....

I have been asked several times what is the purpose of using Google Glass in my classroom, if I want to capture evidence of learning why don't I just use my iPad or phone.  My argument is that Google Glass is more than just a camera or video camera, its a tool.  Like any tool it can be misused or even under used.  My goal is to find many different uses for this tool in my classroom or even out of my classroom.

This week I am monitoring the #Edmodo and #Edmodo Support feed in Twitter. As I was keeping an eye on the feed I noticed several people posting in a language other than English.  I thought to myself how in the world am I going to translate these posts quickly.  It dawned on me I should try to see if I used the Word Lens for Glass app.  That app may be able a solution to see quickly what is being asked in the feed.  In a blink of an eye the non English words transformed to English for me.  This was mind blowing for me.  What a powerful tool.  I thought out loud I can definitely use this tool with my non speaking English students.  My mind went into overload as I thought of ways to put this tool in the hands of my ESOL students.  My first thought was if there was something in print that wasn't translated and that student needed some clarification.  By putting on Glass in a second they could see it in their 1st language.  Then flip that idea if there was something they didn't know how to write out in English have them write it in their 1st language and have Glass translate it for you.

You can also use the voice part of Glass and have something translated for you as well.  The Word Lens app for Glass just blew my mind.  I did see it demonstrated at FETC but to actually do it is a totally another thing.

Reflection of MACE '14 ....

Reflection of MACE '14 ....

MACE or the Mid-America Association for Computers in Education is always the little shot of inspiration I need this time of year.  Even though a lot of the topics are things I already do and teach others about. I love to listen and learn how others use the tools as well or just get their perspective on the tool or topic.  This year was even more inspiring for me as I presented How to Create a Global Project.  If you would like the resources I shared during my session you will need to 1st create a Edmodo account if you do not already have one.  Then you will need to join my MACE - Global Project group, I will have to approve your request.  In side the group you will have access to all the resources I shared plus you will be able to connect and post questions within the group.

Click Here to join the MACE 2014 - Global Project Group.


One of the session I went to really inspired me to help my students learn to code, create, problem solve, & experiment.  I couldn't get these words out of my head after attending this session Computational Thinking & 21st Century Skills with Scratch, SNAP & Finch Robots.   Listed below are the resources shared from that session.
Computational Thinking is Problem Solving 

Tools:

  • Let’s Teach Kids to Code - TED Talk - http://www.ted.com/talks/mitch_resnick_let_s_teach_kids_to_code
  • Scratch - Web Based - http://scratch.mit.edu
  • Scratch - Download - http://scratch.mit.edu/scratch_1.4
  • Can now use a camera to make an interactive game such like Kinect 
  • Code.org
  • Hour of Code
  • MIT App Inventor- http://appinventor.mit.edu
  • SNAP - http://snap.berkeley.edu - Will run on iPads
  • Scriptastic - http://scriptastic.greenbush.us
  • KinderCoder - http://blog.greenbushlabs.com/?p=1638
  • The Finch - http://www.finchrobot.com
  • Hummingbird Robotics - http://www.hummingbirdkit.com
  • Khan Academy Computer Programing - https://www.khanacademy.org/cs
  • Code Academy - http://www.codecademy.com


https://docs.google.com/presentation/d/1r6nFkfR63v71-jIrySjIx5MYDedurrnPmDY2U5afx80/edit#slide=id.p

Below is my take away from the session on 21st Century Learning Environment Connecting School, Home and Community Through Educational Integration and Tools of Engagement.
  • Every time you are using your IWB - Record IT
  • Record the Lesson you are doing.  Make it available.
  • Share you resources
  • Use Meta Tags for Standards
  • Manage Your Digital Rights
  • Same Access at HOME and School
  • Manage Bandwidth
  • Look for Timestamps
  • Make your resources available to parents
  • Best File converter for video - YouTube
  • Use Free Educational Resources & Digital

IMS Global Learning Consortium - http://www.imsglobal.org

Tools of Engagement:

  • Wolframalpha - https://www.wolframalpha.com
  • November Learning - http://novemberlearning.com
  • Diigo for Education - https://www.diigo.com/education
  • Advance Search for Google
  • Google Maps

What also inspired me was Open Source Badges.  I use badges in Edmodo for my students and I am collecting badges for myself on a professional level.  What gets me is why didn't I think of using Open Source Badges with my students, so that they could post them in a digital portfolio.

Resources for Open Badges:

  • Mozilla Open Badges - http://openbadges.org
  • Credly - https://credly.com
    • BadgeOS - To creat badges
    • Open Badge Designer to Create Graphics
    • Credly Login for Wordpress - allows users to login with Credly account
    • BadgesOS Badge Stack Add on
  • Achievement
    • Tie back to CCSS - 21st Century Skills
    • Set up tasks


Presentations Beyond PPT

  • Google Drive & Google Apps
  • Biteslide - http://www.biteslide.com
  • Google Presentation - https://drive.google.com/templates?type=presentations#
  • SlideGo - http://www.slidego.com
  • Draw.io - https://www.draw.io
  • Mural.ly - https://mural.ly
  • Thinglink - https://www.thinglink.com
  • Glogster Edu - http://edu.glogster.com
  • Wondersay - http://www.wondersay.com
  • WorditOut - http://worditout.com
  • PicLits - http://www.piclits.com/compose_dragdrop.asp
  • Smore - https://www.smore.com
  • GoAnimate - http://goanimate.com
  • Animoto - http://animoto.com
  • Prezi - http://prezi.com
  • Haiku Deck - http://www.haikudeck.com
  • Popplet - http://popplet.com
  • Poetics App - https://itunes.apple.com/us/app/poetics/id543995959?mt=8


Apps that Bring Learning to Life

  • ColAR - http://colarapp.com
  • AR Flashcards - http://arflashcards.com
  • AR Flashcards - Space - http://arflashcards.com/ar-flashcards-space
  • Aurasma - http://www.aurasma.com
  • https://itunes.apple.com/us/app/aurasma/id432526396?mt=8
  • https://play.google.com/store/apps/details?id=com.aurasma.aurasma
  • Studio Aruasma - https://studio.aurasma.com
  • Layar - https://www.layar.com
  • https://itunes.apple.com/us/app/layar-augmented-reality/id334404207?mt=8
  • https://play.google.com/store/apps/details?id=com.layar
  • FaketicketGenerator - http://www.faketicketgenerator.com
  • Polleverywhere - http://www.polleverywhere.com
  • Google Translate- http://translate.google.com
  • 4D Elements - https://itunes.apple.com/us/app/elements-4d-by-daqri/id782713582?mt=8
  • HumanAnatomy 

App / Tool of the Week .... Creating a Word Wall via Padlet

App / Tool of the Week .... Creating a Word Wall via Padlet 

Padlet is an online bulletin board so to speak.  I like to use Padlet to build an online word wall with my computer apps students.  Using this online tool has helped my students learn how to collaborate online.  Padlet is very easy to use and very easy to set up.


Setting Up a Padlet Wall:

  • Create an account / Login
  • Click "Build a Wall" or the + sign
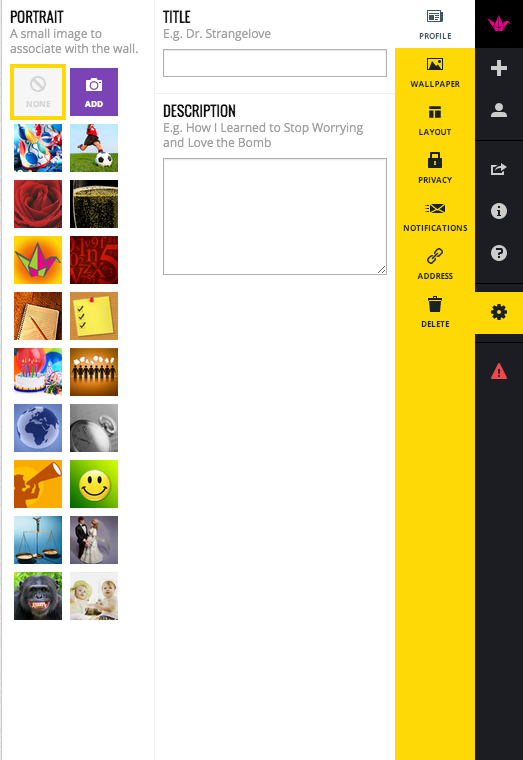
  • On the Right Hand Side are your options.  If you hover over them you will can see what they do.  For example Help, Create Wall, Modify this Wall, & etc....
  • Find Modify this Wall
  • Name your Wall
  • Give your Wall a Description or Instructions
  • Pick a Profile Picture or Upload one
  • Pick your Wallpaper or Upload one
  • Choose your Layout - Freeform can be posted anywhere on the wall.  - Stream posts are posted nice and neatly in a stream.
  • Choose your Privacy Level
  • Modify the URL (Web Address)
Once you are ready to have your students or teachers post to your wall share your URL (web address) of your wall.

Padlet Tips:

  • The Paper Crane will take you to the "Home" page of Padlet.
  • The 4 Squares will take you to all of your Padlet Walls.
  • The + Sign will create a New Wall.
  • The Box with the arrow coming out is to share.
  • To make a post click on the Pencil at the bottom left corner of the wall.

Examples of my Padlet Walls:

  • Word Walls
  • Exit Tickets (assessment)
  • Brainstorming
  • Collaboration
  • Sharing Resources
  • Many More....


Moving Out of the Lab....

Moving Out of the Lab....

In the past students and teachers could only obtain access to technology was through a lab setting.  Schools hired professionals to teach and or train students how to use the technology.  Once students left the lab setting they left the technology behind.  In todays world that is no longer the case.  With schools going 1:1 with devices is the lab really needed?  There are some pros and of course cons to having a lab and 1 person responsible for teaching how to use the tech.

Pros for a Lab: 

  • All devices are set up the same and have the same programs.
  • 1 person is responsible for the instruction.
  • Instruction is structured. 
  • Desktops don't walk away and are stationary.
  • Can be monitored.

Cons for a Lab:

  • Only 1 person is responsible for the instruction.
  • Desktops are not mobile.
  • Technology and skills stay in the lab.
  • Limited time and use in the lab.
  • Instruction is structured.
When it comes to technology and learning how to use it needs to be put in real world experiences not in a structured lab setting.  One teacher shouldn't be the only one teaching kids how to apply the technology in real world settings.  Technology is no longer just available in a lab, but can be found everywhere.  The more diverse kids are with technology the better prepared for the real world they will become.

How Educators Can Connect and Learn the Tech:

  • Find the Learning Platform that works for you either being face to face, online professional development, webinars, edcamps, and etc...  
  • Don't be afraid to let your students teach you how they use the tech.
  • Don't be afraid to fail.  Failing is the 1st step in learning something new.  When we learn to walk we fell with each step until we mastered balancing and walking.  That didn't stop us from wanting to learn to run.

My Personal Learning Network: 
Just to name a few

App / Tool of the Week - PocketCloud ....

App / Tool of the Week - PocketCloud ....

I have a MOBI which is a handheld device that lets me control my computer, SMARTBoard tools, and other applications remotely.  When the software updated recently it had stopped working, due to the computer I was using having an outdated operating system.  I spend most of my time walking around my classroom and loved that I could control my computer from across the room.  Since my MOBI wasn't working I started researching apps for my teacher iPad that would do the same thing as what my MOBI did.  I found a handful but they cost money.  Being a teacher and lack of funds I needed an App that was low cost or no cost.  I found the following app PocketCoud Remote Desktop.

This app is free.  You do have to visit their website and download the computer software to the computer you are wanting to control.

Steps to Set up the PocketCloud:


  • Click to Download the App 
  • Visit their Website and Download and Install The Campaign (click to visit their website)
  • Run the Computer software.  The username for the computer part of the setup is the name of your computer.  The password will be the password for your computer.
  • To Auto Detect - Enter your Gmail and its password.  This will auto detect your iPad with your computer.


On your iPad:

  • After you have downloaded the app to your iPad you will need set it up to see your computer.
  • Click Auto Connect.
  • Enter the same Gmail you used when setting up your computer.
  • Make sure you are running the computer software.  If so then you will need to click Done.
  • Click Connect.
  • It will ask you for your computer credentials.  The computer name and your computers password is what you will enter. (You should only have to do this once.)
  • Now you should be able to control your computer. 


Tech Tips:

  • Once you have your iPad is connected to your computer play around controlling your computer via your iPad.
  • There is a little lag between your iPad and computer so be a little patient.
  • To use your IWB a.k.a. SMARTBoard tools remotely you need to have them installed on the computer you are controlling via your iPad.  


Update on eBook ....

Update on eBook ....

I created an interactive eBook via iBook Author for my 8th grade Computer Apps class.  It has some video clips I made or found very helpful along with interactive review questions and helpful screenshots.  I used the eBook this past semester with my students.  The feedback from my students was very positive.  They liked being able to watch, pause, rewind, and even fast forward the video clips I made. I also received high marks from my students because I had hyperlinked the videos to my classroom YouTube channel.

Now that I had a chance to use it with students I went back through my eBook and made some minor adjustments suggested by my students and added student created examples.

If you would like to view my little eBook Mrs. Wilson's Computer Apps - Let's Take Flight please click here.  If you had previously downloaded my eBook via the iTunes store you should see in iBooks that is has an update.  As I continue to use this book with my students I will be updating it as well as adding more resources.

I am also known as the Queen of Typos.  If you see a mistake please let me know.

My Favorite Apps or Tools for 2013 ....

My Favorite Apps or Tools for 2013 ....

colAR Christmas Tree

2013 has been a great year to explore new apps and web tools.  Listed below are just a few of my favorite apps or web tools.

Apps or Web Tools to Try:


If you haven't tried these tools or apps I suggest you give them a whirl.


App / Tool of the Week .... Livebinders

App / Tool of the Week .... Livebinders

Think of Livebinders as a Digital Trapper-keeper.  I like to use Liverbinders as a Digital Portfolio for my students.  Student can create a Digital Binder and add their work.  This Digital Binder can follow them through their Educational Career.  Students are then able to then show their growth.

Things You Can Add to Your Binder:


  • PDF, Word, & Spreadsheet Files 
  • Websites
  • Images
  • Videos 
  • Basically anything you can make digital can be added.

Ways to Use Livebinders:

  • Organize Class Resources
  • Science Fair Projects
  • Class Projects
  • Research Projects
  • Showcase Student Work
  • An Assessment Tool

Example of a Digital Portfolio:


App / Tool of the Week ... Edmodo

App / Tool of the Week ... Edmodo

I bet you are wondering what is Edmodo and why should I use it. Edmodo is a secure platform that brings your classroom into the 21st century. It allows your classroom and resources to be accessible to students 24 hours a day and 7 days a week.  Edmodo is designed to get students excited about learning and mirrors a social network.  It also makes it easy for teachers to create a blended learning experience while teaching 21 century skills.  Edmodo offers engaging, easy-to-use apps that integrate seamlessly and personalize learning for every student.

Edmodo is all about connections.  It allows teachers to build a powerful network that connects them to students, parents, administrators and publishers.  It makes assessing students knowledge simple to track with student progress. Teachers can get the pulse of the class through polls, quizzes, discussion, and more.  Edmodo can be accessed through your computer's browser or the app for a mobile device.  There are over 23,000,000 user from around the world using Edmodo. 


Useful Slideshow on how to use Edmodo

Getting Started:

  • Create your account
  • Complete your profile
  • Create a group
  • Invite students and peers
    • Share resources, lead collaborative discussions, give assignments, quizzes, polls and more
  • Install Apps
    • Engage students, inspire creativity, assess learning
  • Follow and participate in communities

Best Practices for Social Learning:

  • Do not post group codes publicly 
  • Lock group codes after all members have joined 
  • Monitor posts 
    • Set up notifications 
  • Use read-only status when useful 
  • Encourage students to select unique passwords 
  • Set expectations

Now to answer the question "Why should I use it?"  My answer is WHY NOT!

The Global Digital Scrapbook Project

The Global Digital Scrapbook Project

Project Founder & Coordinator - Katie Ann Wilson - @katieann_76

Project Goals:

Teachers and students will engage in discussions with others during the project about their country, school, hobbies, favorite activities, etc.
Students will learn to respect and appreciate the opinions, cultures and customs of others.
Students will be able to see the differences and similarities between themselves and others around the world.

Duration: 2013-2014 School year.


Targeted Grade Levels/Age Groups: All ages.

How This Project Works:

Teachers and students will use Edmodo to communicate with the others in our group. Edmodo is a social network that allows students and teachers to create groups that are closed to the public.

Guidelines:

Please make sure your students are using proper grammar and spelling and not using “texting” language. This is an educational group. Teachers should moderate all comments in the group. If you see anything anything inappropriate, take a screenshot of it and then delete it. Share the screenshot with that students' teacher and use it as a "teachable moment" to explain what postings should look like.

Please be committed to commenting in the group about once a week. It is not fair to the other group members when classrooms don’t follow through after signing up for a project.

Students and teachers will each need to create their own individual Edmodo account with a username and a password. After you sign up I will send you an email with the group's URL so that you can join. You will also receive an email from Weebly inviting you to join.

Here is the link to the Home Page gdsp2013.weebly.com

For further information
DM @katieann_76

My Recap of Edmodocon 2013.....

My Recap of Edmodocon 2013.....


I bet you are asking yourself what is Edmodocon.  EdmodoCon is an entire day of short professional development sessions on a variety of topics on using technology in the classroom and is sponsored by Edmodo broadcasted in a webcast.  I was just one of the 25,000 educators from 170 countries enrolled for this one of a kind conference.  There were several viewing parties, where educators got together and participated virtually as group during the conference.  I myself was a party of one.

During the conference I learned a lot about Edmodo itself.  In the past I used Edmodo here and there with a small group of students.  Listening to how others have used this powerful online tool inspired me to totally embrace all of what Edmodo can do.  I didn't realize how powerful the groups can be within Edmodo.  During the conference I kept hearing how kids love to earn badges.  During one of the breaks I created Ancient Egypt, Ancient Rome, and keyboarding badges.  I plan on creating more and defining how to earn them later this week.

In the past I knew about the folders but I wasn't very organize when I uploaded my stuff to the library.  During another little break I was able to organize the items I already had thanks to a teacher I was in a chat with and started adding new items that were shared in the community.  I didn't have to upload items if someone else already shared it what a concept.

I am wanting to do Flipped Instruction with my students so the Edmodo platform just became the right choice for me.  I love the idea that I can connect with classrooms from around the world.  Having everything in one place, assignments, quizzes, videos, and etc... will just make my life a whole lot easier.

I am also taking "The Challenge" to apply at least one thing I have learned from Edmodocon.  I looked at the list of all that have signed up for "The Challenge" and I was 23rd on the list.  For the first 500 people who participate in the whole process by completing "Th Challenge" form and completing the form they will share October 1st, will win $100 in promotional Edmodo Store Credit to install and integrate apps in your groups.  I am kind of motivated and would love to have the GoAnimate app for all of my students.

I use Google Docs in my classroom I had no idea that I could incorporate my already created Google Forms/Docs/Spreadsheets and etc... within Edmodo.  This discover with the help of yet another teacher I was chatting with during the conference made my heart sing.  You can also embed items.  So if you have embed codes they should work wonderful within Edmodo.  There was so much information shared I have picked a handful of my favorites to share with you.

My Global Project thanks to Edmodocon 

Resources:

Tips:

  • Make folders in your "Library".  Keep organized!
  • Join groups/communities that fit your needs.
  • Lock down your groups.
  • Use the widget to help turn items on and off with in your groups.
  • Use the Filter to help filter posts.
  • Modify your notifications to fit your needs.
  • Make connections within Edmodo.

Introducing the App or Tool of the Week .....

Introducing the App or Tool of the Week .....

I have learned a lot in the past year or so about different apps for my iPad and web tools I can use for my personal, professional, and classroom.  My toolbox is over flowing with these tools so I thought it was time to start sharing my favorites.  At least once a week I am going to try to share an app or tool I have found very useful.  To launch the App or Tool of the Week I wanted to start off with a tool I use daily which is Symbaloo.

Symbaloo is a pin type of board a.k.a a webmix or social bookmarking tool.  It can be private just for you or you can share it.  I love it because I can organize my resources, student examples, and tools on a webmix and share it.  One of the features I love the most is the ability to embed a webmix on to my classroom website.  This helps me guide my students to where I want them to go.  There is no more of me hearing "Where do I do to go Mrs. Wilson.", "What was that address again.", or my favorite one "I can't find it, I think you told me wrong".

Another feature I really like is that you can copy and add links to other webmix without losing the original link.  For example if I want 4 groups to have the same resource all I have to do is add it to one webmix and then copy it over to the other 3.

To Get Started Making a Webmix:

  • First you will need to create an account.
  • There are many ways of doing things what I find easy in making a webmix is to click on the "Plus Sign" that is located under my name at the top right hand side of the screen.
  • Name your webmix.
  • Click the "ADD" button.
  • Next it is time to add a website or URL.  Click on a Square.
  • Click Create Title.
  • Add your web address where it says http:// - The easiest way is to copy and paste directly from the website to avoid typos.
  • You can modify your square by telling it to show the a Title, changing the color, adding a graphic, and etc... 
  • Click the "SAVE" button when you are finished.
  • If you don't like where the square ended up you can drag and drop it to the location on the webmix you desire.

Tips:

  • Copy and Paste the URL instead of typing it in.
  • When you add a new square update your webmix.
  • Stay organized.  If you have resources on a topic I would group them together. 
  • You can color code your squares.
  • Check to see if your link you just added takes you where you want it to go.


My 1st e-Textbook....

My 1st e-Textbook....

To really embrace Flipping my Classroom I have created my 1st e-Textbook.  This book is full of video clips, interactive review questions, and screen shots.  I designed this book by topics not necessary chapters. My Computer Apps class is an 18 week long course.  During the course I have to cover the topics of Word Processing, Spreadsheets, Research, and Email to name a few.

My goal was to make this e-Textbook interactive and full of resources for my students.  I also wanted to pair this book with my classroom website.  I created a few videos clips with Green-Screen Effect.  I also made a few quick intro video clips via PowTown.  I loved that I could link to video clips from Google, Prezi, SlideRocket, and Glogster Edu.  Why reinvent the wheel if the creator of the tool already made a video clip?

What I love about this is that there is a Glossary and a place built in for kids to take notes.  This is my 1st try at an interactive e-Textbook and I am sure I will be making revisions.

The possibilities for e-Textbooks are endless.


My Recap of Podstock 2013....

My Recap of Podstock 2013....

Every time I attend a conference on educations plus technology I get inspired and energized.  I love meeting and connecting with new people that have the same interest and passion as me.

This year I did a poster session for Podstock on how I did Flipped Instruction within my classroom.  As I was thinking how I was going to accomplish this and make my mini session with people rememberable.  I decided to "Flip" my presentation.  I made my presentation interactive with the use of Augmented Reality and kind of let it speak for itself.  On my board were trigger images.  You scanned the different images with the app Layar and either a student created work appeared or a tool and or resource would appear.  One of the resources was a little video I created in front of my Green-Screen on the different tools I used in my classroom.  I also turned around and made my little handout interactive as well.  I explained that just like my board you could scan the images and magically the resources would appear for them including the video I created explaining the tools and the resources I used.

I love to share what I have learned so below are links to the notes I took while at Podstock.

When I learned that there was going to be a Photo Walk my heart sang with joy.  Below is the link to my Podstock 2013 Photo Walk.  I really enjoyed sharing that passion with others and can't wait how they saw and captured our little walk.
I also love to create something to help me remember my time at conferences.  Sometimes it will be a scrapbook page or two, a collage, or even a slide show.  So this year I took my iPhone and captured a few moments while at Podstock and mashed it all up to create this little video.  I had a hard time picking my favorites.
Thanks for the great connections and I hope you keep in touch.  


Countdown to Podstock 2013...

Countdown to Podstock 2013....


This year I will be presenting a poster session at Podstock '13.  When I 1st submitted my proposal for my session I had it all planned what I wanted to say, what I wanted to show, and how I could put it all together in a face to face session.  I was asked if I could possibly turn my session into a poster session.  It took me a moment to think how I could transform my session.  Then it hit me I am presenting on "Flipping in Our Classroom" why not FLIP my presentation.  My presentation is ready and is very interactive, or as interactive as I could get it.

So you can get the full effect of my Flipped Presentation you will need to download the following app to your Smartphone or Tablet (iPad).
Next you will need to download my handout.  You can print it or just save it to your computer and open it up.  You will be scanning the pictures of my handout to obtain the content.  If you print it out you can print it in Black & White.  The scanning of the pictures will work with either Black & White or Color prints and off of your computer screen.

What you will be experiencing when you scan the pictures is Augmented Reality or AR.  When you scan the pictures using the Layar App you will be given different items to interact with.  One of the items will be a video I created talking about the tools I used to in my classroom to help me Flip it.  Other interactive items will be a slide show of my students working and a Symbaloo board of the tools I used.  Keep in mind that this was my 1st time recording myself, so I was a little nervous.  The next time I record I will have someone in the room so I am talking to them not just my iPad.

For those that do not have a Smartphone or a tablet.  I do have my presentation on a website that you can access too.  


See you at Podstock!

Green-Screen Effect on the iPad ....

Green-Screen Effect on the iPad ....

with Katie Ann Wilson

After I started in using my Green-Screen in my classroom it became a buzz around our school.  Since I have computers I can use to create the Green-Screen effect teachers that have iPads asked if there was an app for that.  I did a little digging and research, even though there is an iMovie app it does not do the Green-Screen effect at this time.  This discovery made me look into other apps and if it was even possible to create the Green-Screen effect with the iPad and not costing an arm and a leg.  My search lead me to Veescope Full.  The app does coast $2.99 but I think it worth it.  Veescope Full is very easy to use.  You select an image from your Photo Library on your iPad, stand in front of your Green-Screen, or in my case my green wall and record.  The image you had picked from your Photo Library is now your background.  Once you finish with your recording it saves in your Photo Library on your iPad.  You can share it like you would any video or photo. 

I have tried doing the Green-Screen effect just using my iPad to record and doing the effect in iMovie on the computer.  Now that I have used the iPad to create the Green-Screen effect video I have to say the Veescope Full app is much easier.  The only issue I had and this could be the techie in me is that you can't change the background image during a recording unless you stopped the recording change the background and then continued recording.  Maybe in the future the company will add a feature that will let you rotate background images while recording.  


Tip:

  • Do not download the Live version.  It will cost you $2.99 in app purchase to create a Green-Screen effect video.  Download the FULL version.
  • You can really use any solid color to do the effect, just don't let the person recording wear the same color as the background they are standing in front of.  I did find out that green is still the best color to use.
  • Invest in a tripod and iPad mount to help keep your videos from having the swaying feel to them.  
  • Record in a silent area.

Courses/Workshops:

I am now offering some courses/workshops on the topic of Green-Screen an iPad.

Visit my website for more details. - www.katieannwilson.com