Showing posts with label #mbedchatblog. Show all posts

Bringing Learning to Life....

Bringing Learning to Life....

My T-shirt that I added Augmented Reality to.
This summer I set out to teach as many people as I could about creating augmented reality or use already created triggers.  I attended an edCamp and brought augmented reality to the attendees.  I stepped out of my comfort zone and presented at edCamp Home on augmented reality as well as did a hands-on workshop at Podstock.  In reaching out to others I thought a community or group was needed to keep connected with those I've reached out to.  With that thought in mind I created 2 groups.  They are both considered a private group where I have to approve your entrance into the group.  I really love Edmodo and their platform they have created.  I like that I can share folders as well as resources to those in the group.  Edmodo also has a place where you can communicate, ask questions, post ideas and etc... I noticed after setting up the group in Edmodo that some people were not as comfortable with that form of group so I created a Google+ community.  I was able to tie my Edmodo folders to my Google+ community so that people in both groups would still have access to all of the content I am sharing.

The resources I am sharing are pre-created augmented reality triggers.  Triggers are images that when scanned with the correct app will give you a unique experience by added an augmented reality component or items.  I am also posting the apps that are needed to use these triggers.  I will also be sharing how to create your own augmented reality triggers with the help of Daqir's 4D studio. The groups are also a way for others to ask questions, get help, share ideas, and etc...

If you are an Edmodo user and would love to join the Augmented Reality group for Educators feel free to join and share.  If you would rather join the Google + Augmented Reality for Educators Community feel free to join and share too.  If you want to join both feel free to do so.

The Groups:


Click here to view my interview with Chromville.

"Bring Learning to Life one Augmented Reality Trigger at a Time"

Exploring Coding.....

Exploring Coding.....

When you mention the words coding and programming most people stand back and say that is too hard or I just don't understand it.  When I mentioned to my students that we are going to work on some problem solving skills and I want to see who can finish all of the maze levels they jump on board. After a day or two of working on the many different levels of the maze I inform my students that they have been coding.  We talk about the if then statements, why they used repeat, and etc...  I then show them where they can see their line of code they have written.  I use the Maze 1 from The Hour of Code with my students.  I also provide them other resources where they can continue learning about coding.

My plan for next year is to go beyond just introducing my students to coding and programming and letting them explore.  I wrote a little grant and have received two items to add to my class which will help me teach kids to code and program.  The Hummingbird Kit with the help of Scratch will turn a inanimate object into a animated object.  The item I will be using with my students is the Finch.  It is a small programmable robot.

Resources:


 Coding Apps:

Glass in Math Class...

Glass in Math Class...

My goal in becoming a Google Glass Explorer was to share this wearable technology with the staff and students in my school.  The 1st few days of bringing Glass into my building was filled with students trying them out and of course the photo op.  The majority of my students really had no idea was Glass was or what it could do.  After a demo or two word quickly spread through the building of the new tech tool and its amazing power.


I noticed that the 7th grade students were busying building scalable buildings in Math Class.  I also noticed that the teacher was having trouble capturing the learning experience.  Thanks to glass the teacher was able to move around the room helping students and capturing the learning experience at the same time without caring a bulky camera, iPad, phone, or any other device that takes pictures.  Glass made it possible for her to use her hands to help students while still capturing the moment
with ease and from the teachers view point.

We are still learning how this wearable technology works and ways to incorporate it into the classroom.  

App / Tool of the Week .... Creating a Word Wall via Padlet

App / Tool of the Week .... Creating a Word Wall via Padlet 

Padlet is an online bulletin board so to speak.  I like to use Padlet to build an online word wall with my computer apps students.  Using this online tool has helped my students learn how to collaborate online.  Padlet is very easy to use and very easy to set up.


Setting Up a Padlet Wall:

  • Create an account / Login
  • Click "Build a Wall" or the + sign
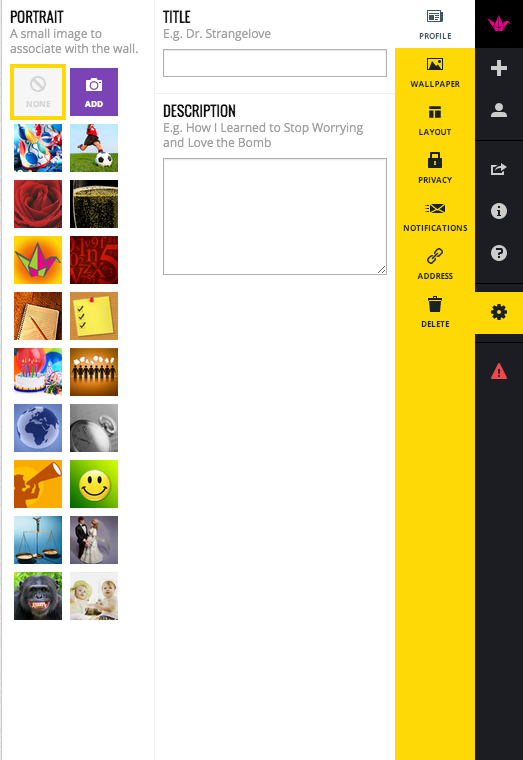
  • On the Right Hand Side are your options.  If you hover over them you will can see what they do.  For example Help, Create Wall, Modify this Wall, & etc....
  • Find Modify this Wall
  • Name your Wall
  • Give your Wall a Description or Instructions
  • Pick a Profile Picture or Upload one
  • Pick your Wallpaper or Upload one
  • Choose your Layout - Freeform can be posted anywhere on the wall.  - Stream posts are posted nice and neatly in a stream.
  • Choose your Privacy Level
  • Modify the URL (Web Address)
Once you are ready to have your students or teachers post to your wall share your URL (web address) of your wall.

Padlet Tips:

  • The Paper Crane will take you to the "Home" page of Padlet.
  • The 4 Squares will take you to all of your Padlet Walls.
  • The + Sign will create a New Wall.
  • The Box with the arrow coming out is to share.
  • To make a post click on the Pencil at the bottom left corner of the wall.

Examples of my Padlet Walls:

  • Word Walls
  • Exit Tickets (assessment)
  • Brainstorming
  • Collaboration
  • Sharing Resources
  • Many More....


Count Down to Glass ....

Count Down to Glass ....

As I prepare for Google Glass to arrive to this small town in the middle of the USA, literally in the middle, I am starting to plan how I can use them in my small classroom.  I really would like to use them not only with my students but with students throughout the school district even down to the little pre-schoolers.  I know that the possibilities are going to be endless and my students will also have a plan for them as well.  One of the 1st projects I want to do is a Green-Screen project.  I am really into creating unique digital stories with the help of Green-Screen effect.  I am not 100% sure how this project will turn out, but I do know it will be one of a kind.

Another project I would like to do is add Augmented Reality to a presentation.  I am not sure which apps yet interact with Glass so I am not certain how this project will fully come together until I have Glass to work with.  I will be inviting the pre-schoolers over to play around with some Augmented Reality objects and have them wear Glass to capture their reaction and learning from their point-a-view.

I know one of the science teachers at the high school has a plan to use Glass and record and document weather.  Not sure how he plans on doing this until we have the wearable technology to see how to pull it all together.  Introducing this technology to the students will definitely be a learning curve.  There will also be lots of problem solving skills being used and a lot of thinking outside the box.

If you would like to help to bring Google Glass to our school and make difference you can visit the campaign page "Bring Glass to Our School".


  • What kind of projects would you like to see students working on using Glass?
  • What apps would you like to see paired up with Glass?


App / Tool of the Week ...... ThingLink

App / Tool of the Week ...... ThingLink

I accepted a Blogging Challenge by Manitoba Educators (#mbedchatblog) to blog at least once a month.  My goal for 2014 is not to fade away but to share my experiences and reflections.  With the help of the challenge and their reminders I should post as least once a month with either an app or tool I've learned about.

ThingLink is a tool to create interactive images. I learned about this tool last year but didn't really have a chance to really start using it.  Since I will be presenting at different conferences this year I thought this would be a great tool to organize some of my content in a fun and interactive way.   I also have plans to turn these interactive images to Augmented Reality objects too. Below is an example of a ThingLink Image.

25 of My Favorite Apps on My Personal iPad.


To make this interactive image I placed the apps I wanted to showcase all on one screen of my iPad.  I then took a screenshot of my iPad.  To take a screenshot hold down the Power Button and Home Button on your iPad.  I like to call the Home Button the Belly Button of the iPad.  I then uploaded my image to my Thinglink account.  I tagged each app icon to the URL of the app in iTunes, so that you can download it easier.  The Layar app is also tagged to the Layar Creator website in case you want to create your own AR objects.


Ideas for Interactive Images:


  • Link to Online Presentations
  • Link to Apps in iTunes
  • Link to Online Resources
  • Research Project and Link to Presentations, Resources, and or Video Clips
  • Book Report and Link to Projects 

Feel free to follow me on ThingLink.